
I love my Excalibur food dehydrator!
- Jamie Musgrove
- Nov 20, 2021
- 13 min read

I've been interested in food preservation for a long time. I started making jam and jelly as a teenager and I'm happy to say the love of canning has stayed with me. Food dehydration wasn't something I knew much about. I remember my Granny drying apples every fall, and I remember her doing "leather-britches", too---but I never really got interested until my friend Beth suggested it. She knew about my love of canning and jam making so she figured it would be a good thing to add to my skill set concerning food preservation. She wasn't wrong!! However, it wasn't until I got my Excalibur dehydrator that things really took off! I've been having a BLAST over the last few months! And I'm SUPER excited to share this blog post with you. It's been a labor of love and I've enjoyed every minute of it. I've learned a LOT, and my pantry is chock full of tasty dried foods.
The following photos and comments have been compiled and added over a 3 month time frame. Some experiments worked out better than others, but I didn't have anything turn into a total failure, which is awesome!! I'd love to hear about YOUR dehydrating experiences--what you like, don't like, successes, and how you use and store the food you preserve.
Drop a line to: jamiehowdoicook@gmail.com
See this photo below? Well, all this food started out weighing well over 50 lbs before I dried it in my dehydrator!! Onions, potatoes, corn, okra, green beans, green peas, peas & carrots, tomatoes and a mirepoix blend. That's a LOT of food, y'all! If I were to dump it all into zip-lock bags and weigh it, I seriously doubt it would be over 10 lbs!


No, I don't have a deal with the Excalibur company (#excaliburdehydrator). I just think their 9-rack dehydrator is divine! It has a thermostat and interior fan which promotes even drying throughout---it's such a HUGE improvement over the little po-dunk dehydrators I've played around with in the past. This Excalibur means business and I am thrilled!! Now--it's not a pretty appliance, and it gives off a LOT of heat, hence the reason she lives in my basement. LOL And truth be told, they are pricey. But in this case, you get what you pay for! My husband found mine on Facebook Marketplace for around $150. The usual price is around $230 for the one I have. So, I feel like I got a total deal. The lady we got it from used it maybe 5 times and was not impressed with the amount of work that food preservation requires. But that's just it----things that take time and effort are generally worth it in the end. The time I invest in canning and drying food is well spent. Plus, it allows me to totally govern what goes into the food we eat. That's important to me. Toooooooo much crap gets tossed in as preservatives or as coloring and well--it's just not necessary. My advice to anyone who has an interest in food preservation is to either find a person with the knowledge and learn from them, or READ READ READ!! There is a ton of information on the internet. Just be sure to learn from someone who knows that they are doing. You don't want to make yourself or anyone else for that matter, sick.


As I mentioned earlier, I played around with other brands of inexpensive dehydrators over the years and truth be told, they work. But---the ones with no fan, just a heating element, take for friggin' ever and I just don't have the time to spare; I like fast. That's why I'm happy to use my Excalibur. In addition to using a fast dehydrator, I've recently discovered some info that I wish I had known 20 years ago. Granted, the info wasn't secret--I just never put 2 and 2 together to connect the dots. Frozen, packaged vegetables that come from the super market are now my best, new-found friend. The food company has to do ALL THE PREP WORK, which allows me to save hours of time. No more
trimming and blanching is necessary! That's a big deal. Think about it: having a garden and growing things on your own is a beautiful thing. But it's hit or miss. You are not guaranteed a crop---there's weather, bugs, diseases, etc to take into account. Then, if you DO manage to grow enough of something to preserve, you generally have to clean it, peel it, cut it up, and blanche it before you can can or dry it. That's a lot of extra steps that I can cut out of the equation by buying frozen vegetables from the store. They are prepped and ready to go!!! Green beans, okra, green peas, carrots, cauliflower, etc....They are PERFECT right out of the bag to put on your dehydrator tray and dry!! It's soooooooo easy! I wish I had known about this a long time ago. Ahhhh....Live and learn. Hopefully YOU are finding out about it early! I don't use pre-frozen for all my drying though. I use fresh tomatoes and potatoes because they turn out better in dried form if you don't freeze them first. I also really prefer to use fresh onions, too---but the bagged onion is so convenient and it keeps me from crying in the kitchen chopping onions, so chose your battles people. I buy a few frozen ones just to help out. LOL
View the slide show below to see how full I pack my trays. See the arrow on the right hand side of the photo.


In the following photos, I'm going to show you before and and after shots of various different vegetables I purchased frozen from the store, as well as some fresh veg I chopped up myself and processed. I'll give you temperature setting and drying times, too. I want you to see the process, plus it will give you an idea of just how much water is in our food.
Keep in mind, several factors play a part in determining the length of time needed to dry an item.
Thick or thin slices, chunks, pieces
Temperature--the lower the temperature, the longer the dry time.
Humidity in the air
Water content of the veg
Level of dryness preferred
The characteristics of the individual vegetable
The strength of your dehydrator
The drying guides on the internet all have their own specific suggestions about what temperature to use and the length of time needed. Personally, I think it's all about trial & error as well as how much time you have to invest! I set my Excalibur on about 125° F. This is a hotter temp than suggested by many due to the fact that the nutrients and enzymes break down at higher temps. The ideal temp to for maximum nutrient retention is 105°-110° F. I turn my dehydrator on when I go to bed and usually by the time I check it in the morning, everything is dry and ready to be bagged or put into jars. It just works for me, but if you decide to try your hand at dehydrating food, you need to find what works best for you! I don't think there is noticeable nutrient loss, and there is no taste factor to worry about since 125° is too low for scorching or burning to happen. I like to set it and forget it. LOL So, while I will list some drying times, be aware that it's just an estimated guess. It takes as long as it takes.
Green Beans:
Scroll through the slides below--see the arrow on the right side of the photo below?


Ready to cook!


To cook them, I simply throw a cup of dried beans into a small pan of boiling water and let them cook for around 10 minutes. Season them to your taste using salt, onion, and some pork!

It's that easy and they cook up just beautifully! Perhaps the drying process does change the structure of the bean because the cooked texture is just a tad different than what you find in a cooked fresh or frozen bean. But it's not anything bad and I barely notice it. I could eat them all day with NO problem!! Green beans are inexpensive, and most everyone likes them so they are a great food to dehydrate and keep stocked in your pantry for a rainy day.
Tomatoes:
Drying temperature: 125° F
Drying time: 6-9 hours
Below you see a big bunch of Roma tomatoes I processed. I swear--dried tomatoes are SOOOOO sweet! It's like tomato taffy or a tomato fruit roll up!! It's concentrated tomato flavor and it's is so wonderful! I dried them with a few racks of onions---the basement smelled like a pizzeria and almost drove us crazy! Haaaaa!! They rehydrate well for soups, stews, and recipes that call for canned tomatoes. No, they are not good on sandwiches once you rehydrate them--that calls for a FRESH tomato. Leave the dried-then-rehydrated ones to cooking related recipes only.
Here's an idea---you can fill a mason jar full of dried Roma tomato slices, some dried Italian herbs, a little salt and cover them completely with olive oil. let the jar sit for a week or so---check the tomatoes to see how the rehydration is coming along. They will not get completely soft like a slice of fresh tomato, but they will get soft and chewy. Top off the oil and you have yourself a lovely jar of tomatoes that you can use in sauces! You will have to mince the tomato into small pieces or even in a food processor, unless you just really like VERY chewy food! LOL It would be great served on toasted Italian or French bread as an appetizer---just add some balsamic vinegar with some of the oil from the jar and you are set!!


Onions:
Drying temperature: 125° F
Drying time: 4-8 hours
Onions are one of my most favorite cooking ingredients. I use them in everything. I thank God above Brad likes onions, too. They are very easy to dry. You just chop em' up and spread them out. They store just beautifully and cook up very nice. They dry up very small so you can store a LOT of onion in a small space. Chopped or sliced, onions are an excellent vegetable for dehydrating. I've never tried drying a green onion, but I intend to because I'm curious how it would turn out!


Mirepoix:
Drying temperature: 125° F
Drying time: 6-10 hours
This is a frozen bag mix of carrot, onion & celery. It's wonderful as a soup starter. You can even pulse it down in a food processor and use it in a cheese ball.


Okra:
Drying temperature: 125° F
Drying time: 4-8 hours
Okra dries out just beautifully. And it cooks back up beautifully, too! Honestly, it's good as a snack--I sprinkle a little salt on the dried okra and much on it. It's kind of addictive---chewy, salty goodness! But--I really love okra so you'd have to be your own judge!
Since the okra is blanched before being frozen, it cooks up very quickly after it's rehydrated. I add it to soup, gumbo, or to a pan of diced tomatoes--it's wonderful stuff!


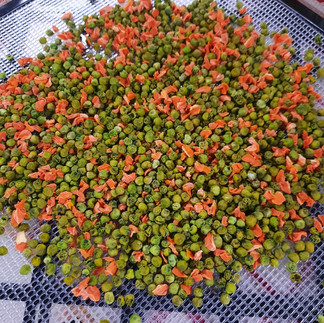
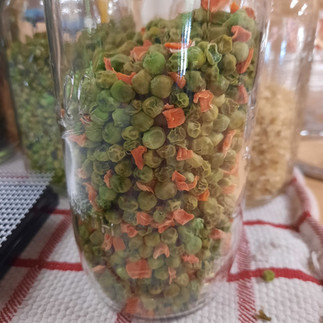
Green Peas and Peas & Carrots:
Drying temperature: 125° F
Drying time: 4-8 hours for just peas, 6-10 hours for peas and carrots
Talk about quick and easy!! Peas dry out and hold their shape very well---and they cook up in a flash. They don't have a weird tooth-feel to them, either. The carrots do have a bit more texture when cooked but I don't mind it. You just have to let them cook a bit longer. I suggest buying bags of one veg rather than a mixed bag. The carrots take a lot longer than the peas to dry, so I don't buy frozen peas & carrots that come in 1 bag.


Corn:
Drying temperature: 125° F
Drying time: 6- 10 hours
Corn is NOT my favorite food to dry. I mean--it's good but...It takes forever for it too cook back up. And it's not worth the effort of trying to dry a frozen bag of mixed vegetables that contain corn---everything else dries a LOT faster than the corn and you end up wasting energy. If you insist on drying corn, use just plain frozen corn by itself.


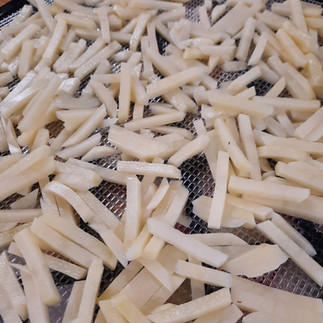
Potatoes:
Drying temperature: 125° F
Drying time: 6-14 hours
Ok, I absolutely LOVE to dry potatoes!! And I always use fresh ones. I've never dried frozen ones although I am a bit interested--I might have to try it just to see what happens. But using fresh ones works just fine for me. If you like to buy scalloped or au gratin potatoes in box form from the store then you'll be familiar with how a dried potato feels texture-wise. They are hard and very light weight! They cook up fabulously well though and taste just like a regular potato! I have a fabulous chopping machine that makes perfect diced and julienned sliced pieces. I peel the potatoes first---I am not a fan of dried potato skin. They taste like dirt! Once they are peeled, I let them soak a while in a bowl of clean water with some fruit fresh or lemon juice/vinegar. This helps them from totally oxidizing and turning an ugly brown once they are dried. It doesn't keep them pearly white but it's close enough for me. I find that high-starch content potato like a Russet or an Idaho brown the most. A medium-starch potato like a White potato is my particular favorite one to dry. They stay a nice color and I really like their cooked texture. But, use what YOU like. That's the key. Once they come out of the dehydrator, they are ready to be added to soups, stews, and casseroles galore! I love making potato soup out of them. I let them cook a while then go at them with my immersion blender. They get almost silky in texture!! I adore it!


Beef Jerky:
Drying temperature: 140°
Drying time: 6-8 hours
I had nothing to do with the jerky making. It was all Brad! We had gone in halfsies with some friends and bought a whole cow and we got the heart. Brad made the jerky from the HEART! It's delicious, y'all! Don't gross out---the texture was excellent and the taste is pure beefy goodness! Oscar totally agrees! See him in the last pic? He's ALWAYS a willing taster! I'm looking forward to the time brad brings home a deer---deer jerky is a lovely thing! I'm a tad interested in drying some type of fish but I haven't worked up the nerve to try it yet. Haaa!! Maybe I'll just stick to beef & deer.


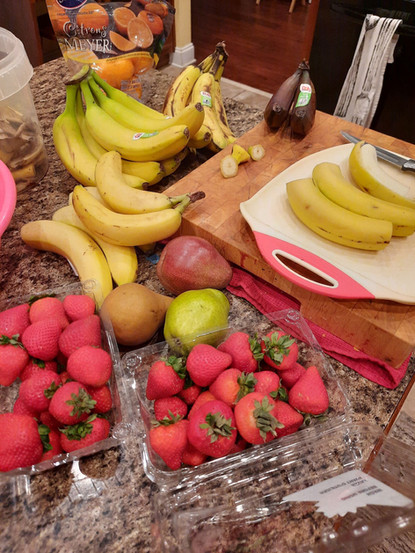
The dehydrator is NOT just for vegetables & jerky. I've also played around with some different fruits. Apples, bananas, strawberries, pears, and Myer lemons all dry just beautifully! The drying temp on most fruits is higher than that for vegetables---I set my dehydrator temperature at 135° F and let it go overnight. The strawberries and lemons were dry by morning. The pears required a few extra hours and the bananas took ALLLLLLL day! They are so full of moisture that I didn't think I could get them past the gummy center stage but they finally gave it up and got dry enough for me to put them in a jar.
To keep fruit from browning, I generally soak it in lemon water. Apples, pears, and bananas all benefit from a soak. Citrus fruits and strawberries and other berries do not. For the pear-soak, add a squirt of honey to the lemon water. It gives the dried end product a golden color and a beautiful texture!


Dried apples make the absolute BEST apple pies. It's something about the drying process---the apple completely changes structure inside and the sugars are very pronounced so that when you cook them down, you end up with the best tasting bowl of apples EVER! My Granny dried apples every season---she had my Papa build her some long, shallow boxes that were covered on the bottom with mesh screen. The top of the box was a screen door on hinges. She spread her fruit out and let them dry for days in the sunshine. I love and admire her method but I do NOT have time for that. Give me a dehydrator any day! You can see below in the slideshow how beautiful my pie turned out. It's a bite of nostalgia for many folks who grew up eating apple pies made from dried apples. What a lovely memory to bring back to life!
Scroll through the pictures below via the arrow on the right:


Different types of apples dry differently. Some shrink up a LOT, while others keep a bit more of their moisture content. Below are examples of a Gala, a Granny Smith, and a McIntosh. I also included some pears. Pears are AMAZING dried! They are one of my new favorites!!

This rack shows a few trays of each variety. There are pears on the top 2 trays followed by the 3 apple varieties. See the 3 pictures below for a comparison of appearance after drying.


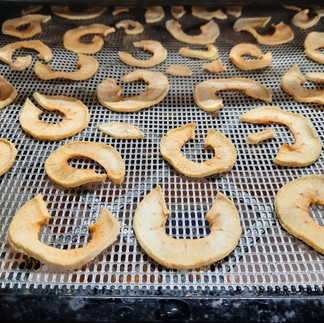


Left: Granny Smith--they hold their shape pretty well and end up with a lovely concentrated sourness.
Center: Gala--they really shrivel up and they have a nice snap--great for snacking!
Right: McIntosh--these guys held their shape the best. Their texture is more chewy than crisp, but they smell AMAZING!! This one is Brad's favorite. I love them all.
Here are the pears. I used Anjou pears on these 2 trays and they turned out just fabulously. I sliced them pretty thin so the end result is almost a pear-paper/wafer. Soooooo good, y'all! You could also use Bosc and Bartlet and get similar results. I've dried them all and find them all delicious.


Citrus fruits dry up spectacularly--you can use them as food or you can use them for decoration, potpourri, citrus oil, etc... The aroma of a dryer full of citrus is hard to explain. It is so wonderful! These are small Navel oranges I sliced and dried. Light passes through them when they are dried---you could string these up and use them for a beautiful, natural decoration on a Christmas tree!!
See how beautiful? You can slip a slice of this orange in a cocktail, or in a cup of hot tea or cider!


And just look at these cupcakes I decorated for my cupcake shop:

I dried apples, oranges, and strawberries and the result is perfect for a Fall-themed wedding, don't you think?


There are endless possibilities, y'all!! I'm going to do limes and cranberries next!! Won't that be pretty?

All in all, I am super stoked about my drying experiment. The Excalibur dehydrator was a CHAMP and produced some beautifully dried food. Is it worth it to dry every type of vegetable or fruit? I can't answer that because it's subjective. But I can tell you that I will continue to dry apples, tomatoes, strawberries, green beans, okra and onions. It's so convenient to have them on hand whenever I want them and not have to reply on canned, processed food from the super market. The dried lemons are quite delightful. Their scent is overwhelmingly citrus and they dry so nice and pretty. I can't help but think what lovely decorations I can create out of dried citrus during the holidays! And they'd be a welcome addition to hot cider and tea, too! The options are endless, y'all. Drying food is a great food prep method and I encourage you to give it a try. I think you'll be glad you did!
Jamie ♥
I hope you have found this post interesting to read. I had a hoot making it happen. I'm very much a "hands on" learner so working with different fruits and vegetables is really the best way to learn the method. Be sure to reach out if you have any comments or questions. I love hearing from you! Happy drying, y'all!! Jamie ♥
Email me at jamiebakes706@gmail.com
Also, be sure to visit me at the following Facebook pages:


Have you tried to dehydrate shredded beef? I was wondering how it is done?